
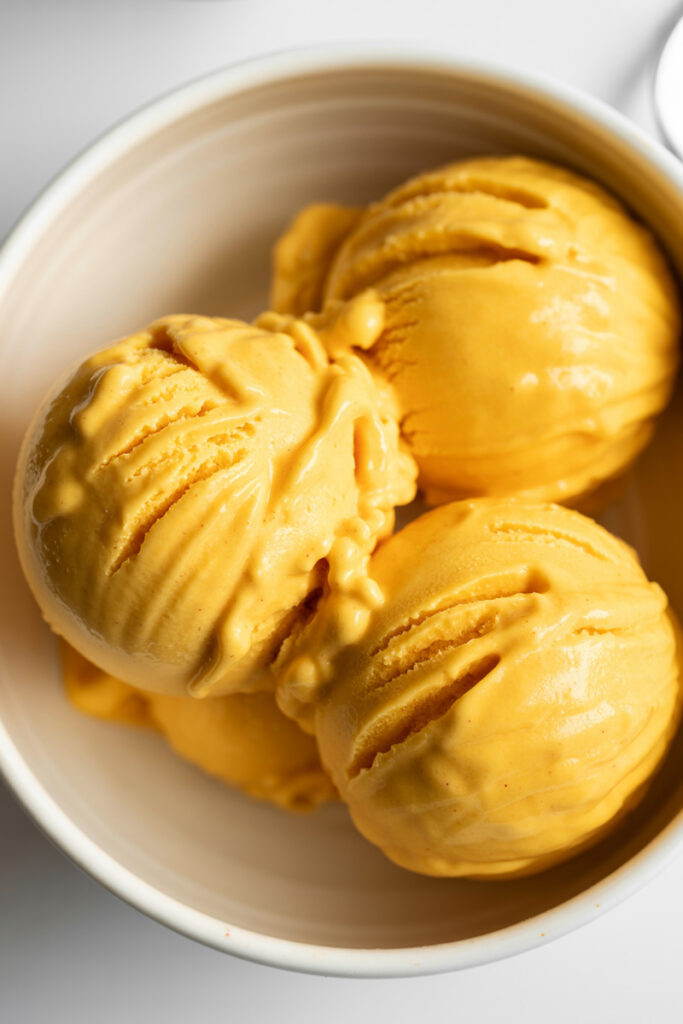
Hey everyone! Are you ready to make one of the best frozen treats of your life? Today, we’re taking a classic fall flavor and giving it a serious upgrade. I’m talking about Pumpkin Pie Gelato.
And we’re going to make it absolutely perfect with the help of the Ninja Creami.
There’s just something about pumpkin pie that feels like a warm hug. It’s the taste of crisp autumn days and holiday get-togethers. On the other hand, you have gelato, Italy’s amazing gift to our taste buds. It’s dense, silky, and just so luxurious.
So, what happens when you smash these two worlds together?
You get pure magic. You get the cozy, spiced heart of pumpkin pie in the rich, unbelievably smooth body of a true gelato. This isn’t just pumpkin ice cream. It’s something special.
Now, I’ll be honest. This recipe isn’t a simple “dump everything in and freeze” situation. We’re making a real custard base.
I know, I know. Cooking custard and tempering eggs might sound scary. But I promise, I’ll walk you through every single step. The little bit of extra effort is what gives you that incredible, premium texture that’s worlds away from anything you can buy at the store.
The result is so worth it. Let’s get into it!
A Quick Look at What We’re Doing
This recipe is a labor of love, but most of the work is done by your freezer. It’s more about patience than anything else!
- Active Time: About 15-20 minutes of hands-on work.
- Chill Time: A full 24 hours. And trust me, you cannot skip this!
- Total Time: Roughly 24 hours and 20 minutes.
This recipe makes one Ninja Creami Pint, which is perfect for 2 or 3 people. Need more? Just double it and make two pints!
| Servings | Heavy Cream | Whole Milk | Egg Yolks | Sugar | Pumpkin Purée |
| 1 Pint | 4 oz | 8 oz | 3 large | ⅓ Cup | ½ Cup |
| 2 Pints | 8 oz | 16 oz | 6 large | ⅔ Cup | 1 Cup |
Difficulty: Let’s call it Intermediate.
Don’t let that word scare you off! We’re only calling it that because we’re tempering eggs. If you’ve never done it, don’t worry. I’m going to show you exactly how. It’s a great skill to have, and once you do it, you’ll see it’s not hard at all.
Tools You’ll Need
- Ninja Creami Machine: Obviously, this is our star player.
- Saucepan: A small or medium one will do the trick.
- Whisk & Mixing Bowls: Kitchen basics!
- Fine-Mesh Sieve (Optional, but not really): This is my secret weapon. Straining the custard guarantees zero little bits of cooked egg get into your gelato. It’s a tiny step for a perfectly silky result.
- Instant-Read Thermometer (Also optional, but super helpful): This little gadget takes all the guesswork out of cooking custard. It helps you hit that perfect temperature (165°F) so your eggs never scramble.
The Ingredient Lineup
Great gelato starts with great ingredients. Here’s what we’re working with.
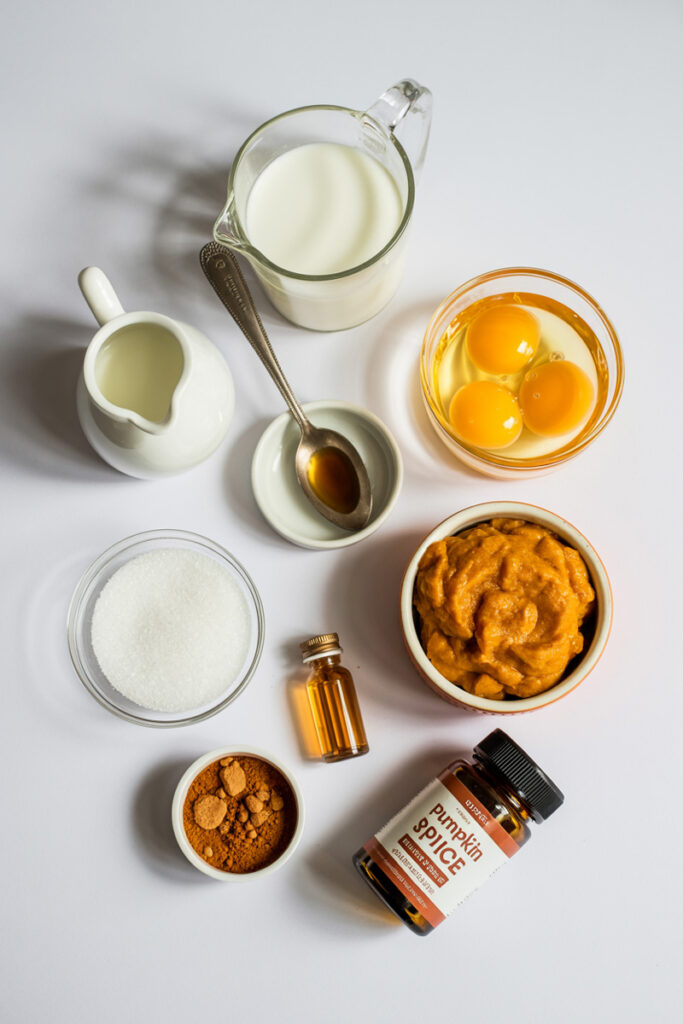
For the rich and creamy custard base, you’ll need 4 oz of heavy cream and 8 oz of whole milk. The fat here is your friend—it’s what makes gelato dense and prevents that icy texture. I really don’t recommend swapping for low-fat milk; it just won’t be the same.
The heart of our custard is 3 large egg yolks. They add incredible richness and make the gelato extra smooth. For sweetness, we’ve got ⅓ cup of granulated sugar and 1 tablespoon of light corn syrup. Quick tip: don’t skip the corn syrup! It’s a trick I learned a while ago. It works wonders to keep the gelato creamy and scoopable by stopping big ice crystals from forming.
Of course, we need our star player: ½ cup of pure pumpkin purée. Make sure you get the 100% pure pumpkin, not the pumpkin pie filling that’s already sweetened and spiced. We want to be in control of the flavor!
And for that perfect spice blend:
- 1 teaspoon of pumpkin spice
- ½ teaspoon of pumpkin pie spice extract (for an extra pop of flavor)
- ¼ teaspoon of nutmeg
Lastly, have 1-2 tablespoons of whole milk handy for later. Sometimes the frozen base can get a little crumbly, and a splash of milk before a re-spin makes it perfectly creamy.
Step-by-Step: Let’s Make Some Gelato!
Alright, apron on? Let’s do this. I’ll be right here with you.
Part 1: Making the Pumpkin Custard
First, let’s get that base going.
In your saucepan, combine the heavy cream, whole milk, corn syrup, and sugar. Set the heat to medium and whisk everything together. We’re just gently heating it to dissolve the sugar, not boiling it. You’ll know it’s ready when you see little wisps of steam.
While that’s warming up, grab a separate bowl and whisk your 3 egg yolks until they’re smooth.
Now for the important part: tempering the eggs. This just means we’re slowly warming up the eggs so they don’t turn into scrambled eggs. It’s easy.
With your whisk in one hand, use a ladle to drizzle a tiny bit of the hot milk mixture into the egg yolks. Keep whisking the whole time. Think of it like introducing two shy people at a party; you do it slowly so they get comfortable. Keep adding the hot liquid, a little at a time, whisking constantly, until it’s all mixed together.
Pour everything back into the saucepan. Keep the heat on low and stir constantly with a spatula, scraping the bottom of the pan. Cook until the mixture hits 165°F (74°C). No thermometer? No problem. The mixture will get thick enough to coat the back of a spoon. If you can draw a clean line through it with your finger, you’re golden. Take it off the heat right away.
Part 2: Flavor Time and The Big Chill
Your saucepan is off the heat. Now for the fun part! Add the pumpkin purée, pumpkin pie spice extract, pumpkin spice, and nutmeg. Stir it all up until it’s a beautiful, smooth, autumn-orange color. Your kitchen is about to smell amazing.
Remember that fine-mesh sieve? Grab your empty Ninja Creami pint, place the sieve on top, and pour the warm custard through it. This little step is a game-changer for a flawless texture.
Let the base cool for a bit on the counter. Then, pop the lid on the pint and stick it in the freezer on a flat surface. Now comes the hard part… waiting. It needs a full 24 hours to freeze solid. The Ninja Creami needs a rock-hard block to do its thing, so don’t cheat on this step!
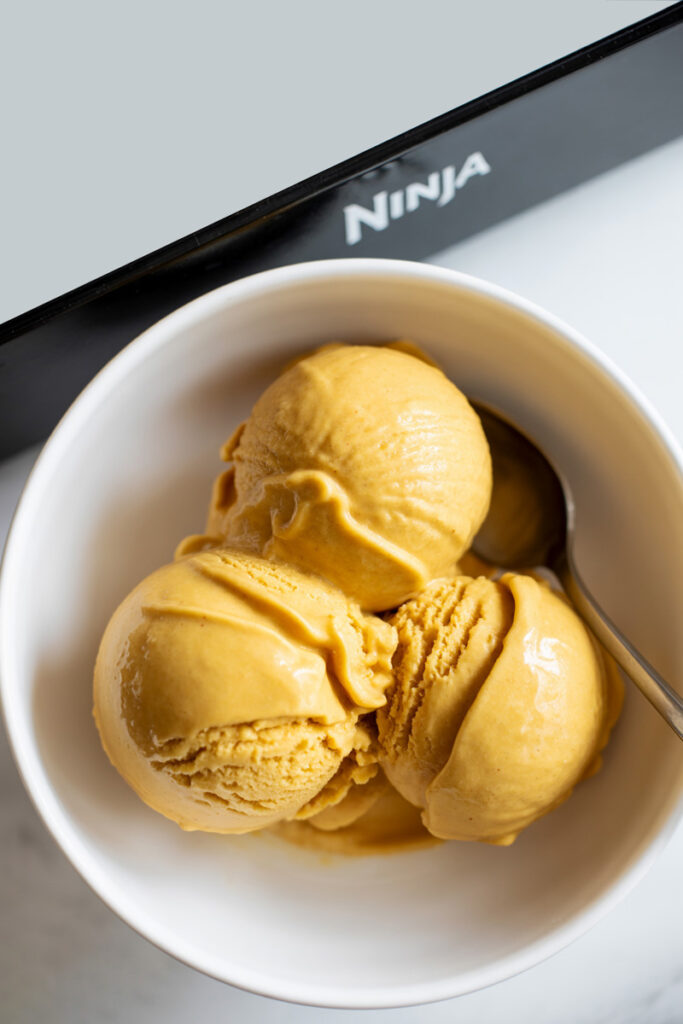
Part 3: The Ninja Creami Magic
It’s been 24 hours! Time to turn that frozen block into gelato.
Take the pint out of the freezer, remove the lid, and place it in the outer bowl of your Creami. Lock the lid on top and put it in the machine.
Press the “GELATO” button and let it do its thing.
When it’s done, check the texture. Sometimes, especially if your freezer is extra cold, it might look a little powdery or crumbly. Don’t panic! This happens all the time and the fix is super simple.
Just add one tablespoon of whole milk, put it back in the machine, and hit the “RE-SPIN” button. That second spin almost always brings it to the perfect, scoopable consistency.
Mix It Up!
One of the best parts of making your own gelato is that you can add whatever you want to it! Here are a few ideas I love:
- Biscoff cookies, crushed up
- Graham cracker pieces for a “pumpkin pie crust” vibe
- Chopped pecans
- A thick swirl of caramel sauce
After the first spin, just use a spoon to dig a little hole down the center, add your mix-ins, and run the “MIX-IN” cycle.
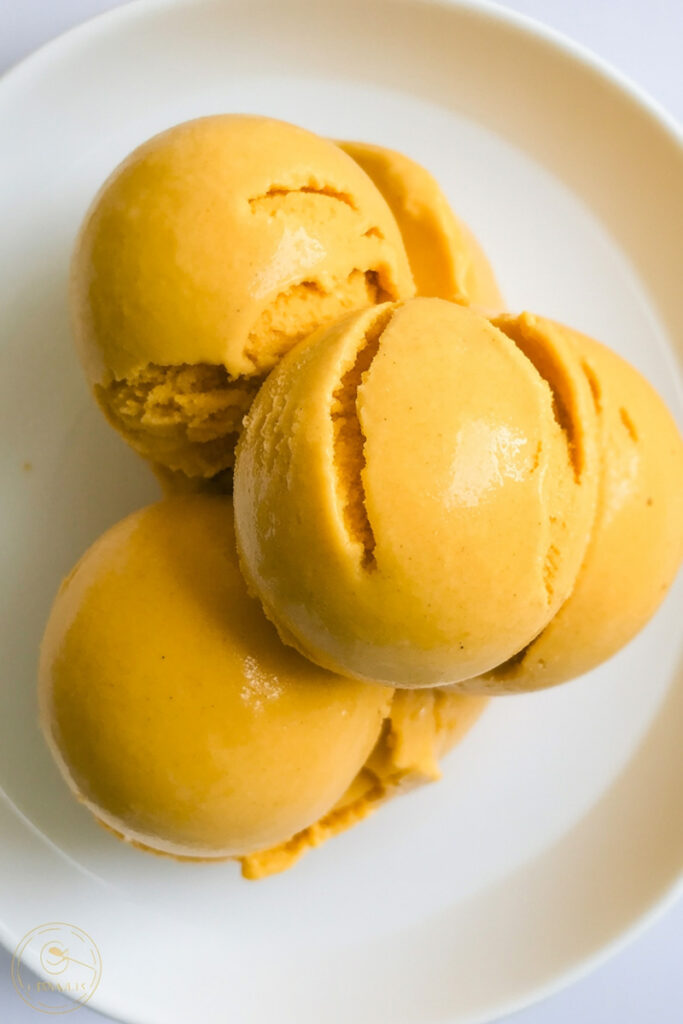
How to Serve and Store It
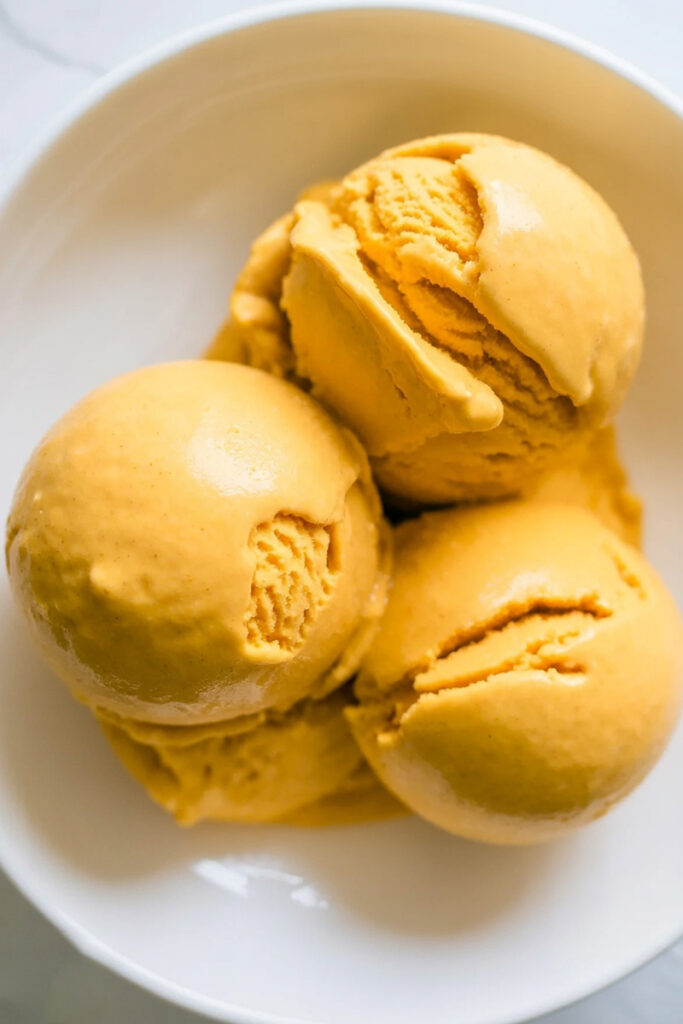
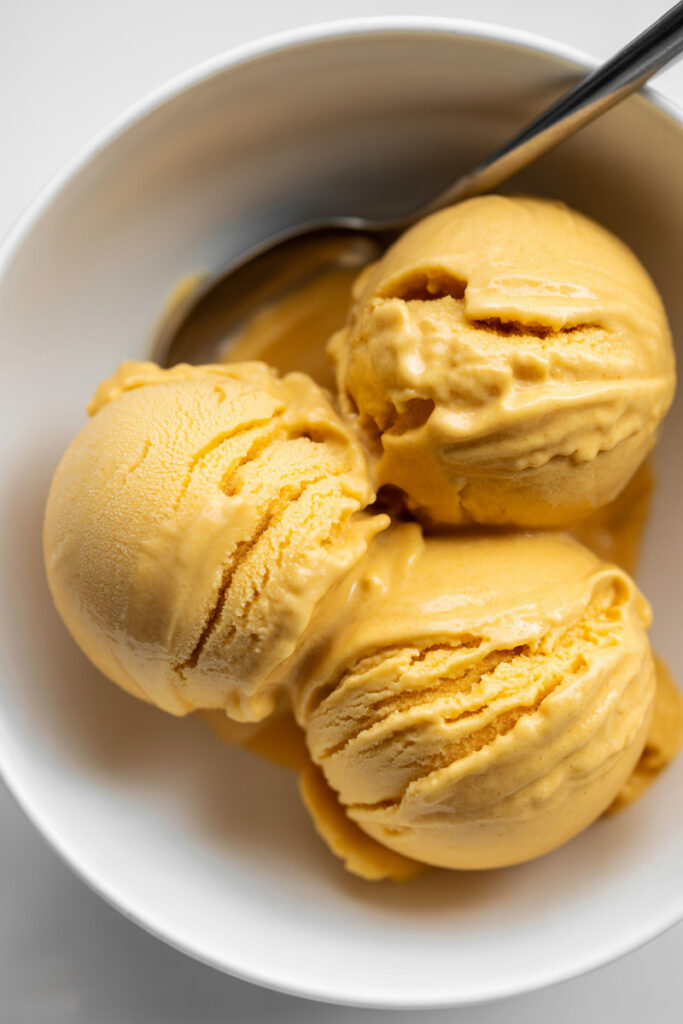
I love to serve this right away when the texture is at its peak. Scoop it into a chilled bowl and add a sprinkle of cinnamon on top.
Got leftovers? Smooth the top of the gelato in the pint container and press a small piece of parchment paper directly on the surface before putting the lid on. This helps keep it from getting icy. It will last in the back of your freezer for up to two weeks.
When you’re ready for more, it will be frozen solid again. You can either let it sit on the counter for 5-10 minutes or—for that perfect just-spun texture—pop it back in the Ninja Creami and hit “RE-SPIN.”
Enjoy your taste of autumn!
PrintNinja Creami Pumpkin Pie Gelato

This recipe transforms the cozy, spiced flavor of classic pumpkin pie into an unbelievably rich and silky-smooth gelato. It’s the perfect autumn dessert, and your Ninja Creami makes getting that perfect texture a breeze!
- Prep Time: 15 minutes
- Cook Time: 5 minutes
- Total Time: 24 hours 20 minutes (includes 24-hour freeze time)
- Yield: 1 Pint (2–3 scoops) 1x
- Category: Dessert
- Cuisine: American / Italian
Ingredients
- 8 oz (1 cup) Whole Milk, plus 1-2 tbsp for re-spinning
- 4 oz (½ cup) Heavy Cream
- ⅓ cup Granulated Sugar
- 1 tbsp Light Corn Syrup
- 3 large Egg Yolks
- ½ cup 100% Pure Pumpkin Purée
- 1 tsp Pumpkin Pie Spice
- ½ tsp Pumpkin Pie Spice Extract
- ¼ tsp Nutmeg, freshly grated if possible
Instructions
- Heat the Base: In a small saucepan over medium heat, whisk together the whole milk, heavy cream, sugar, and corn syrup. Heat until steaming gently and the sugar is fully dissolved (do not boil).
- Temper the Eggs: In a separate bowl, whisk the egg yolks. Very slowly, drizzle about a cup of the hot milk mixture into the yolks while whisking constantly to gently warm them. Pour the tempered egg mixture back into the saucepan.
- Cook the Custard: Cook on low heat, stirring constantly, until the custard thickens enough to coat the back of a spoon or reaches 165°F (74°C). Remove from heat immediately.
- Add Flavor: Stir in the pumpkin purée and all the spices until smooth.
- Strain & Chill: For the silkiest texture, pour the custard through a fine-mesh sieve into your Ninja Creami pint container. Let it cool, then secure the lid and freeze on a level surface for a full 24 hours.
- Spin it! Place the frozen pint into your Ninja Creami and process using the GELATO setting.
- Perfect the Texture: If the gelato looks crumbly, add 1 tablespoon of milk and run the RE-SPIN cycle. This almost always results in a perfectly creamy texture.
Notes
- Serving: This gelato is best enjoyed immediately after spinning! Serve in a chilled bowl with a sprinkle of cinnamon or some crushed graham crackers.
- Tips & Tricks: Don’t skip the corn syrup—it’s the secret to preventing iciness! A digital thermometer takes all the guesswork out of cooking the custard.
- Storage: To store leftovers, smooth the top flat and press a piece of parchment paper directly onto the surface before replacing the lid. Freeze for up to 2 weeks. It will freeze very hard, so run a RE-SPIN cycle to make it scoopable again.