
Hello, fellow food lover! Today, we’re making something special. We’re about to create the creamiest, dreamiest Matcha Ice Cream you’ve ever had. And the best part? It’s high in protein and ridiculously easy to make.
It’s all thanks to my favorite kitchen gadget: the Ninja Creami.
If you’re like me, you’re obsessed with the deep, earthy, and slightly sweet flavor of matcha. It has this calming vibe that I just love. For the longest time, I tried to make matcha ice cream at home, but it always ended up a little… icy. Not anymore.
What makes this recipe different? It’s all about a perfect texture. The Ninja Creami is a beast, turning a solid frozen block into ice cream that’s as smooth as anything you’d get at a fancy gelato shop.
I’ve also packed this recipe with protein and a little secret ingredient (I’ll get to that in a minute!) that completely gets rid of any iciness. The result is a treat that’s both refreshing and satisfying. So, grab your Creami pint, and let’s get started!
What You’re Getting Into
Before we dive in, here’s a quick rundown of what to expect. This recipe is designed to be super simple, but the results are top-notch.
- Prep Time: Seriously, it takes about 5 minutes to mix the base. The real challenge is waiting for it to freeze.
- Freeze Time: You’ll need to be patient for a full 24 hours. Trust me, it’s worth it.
- Servings: This makes one perfect pint of ice cream. I strongly suggest prepping a few pints at once so you have them ready to go whenever a craving hits.
- Difficulty: Super Easy. The machine does all the heavy lifting!
- Equipment: The star of the show is the Ninja Creami Ice Cream Maker. You’ll also need a Ninja Creami pint container and a handheld frother. If you don’t have a frother, a small whisk works fine, too.
The Cast of Ingredients
Great ice cream starts with great ingredients. Let’s talk about what we’re using and why.
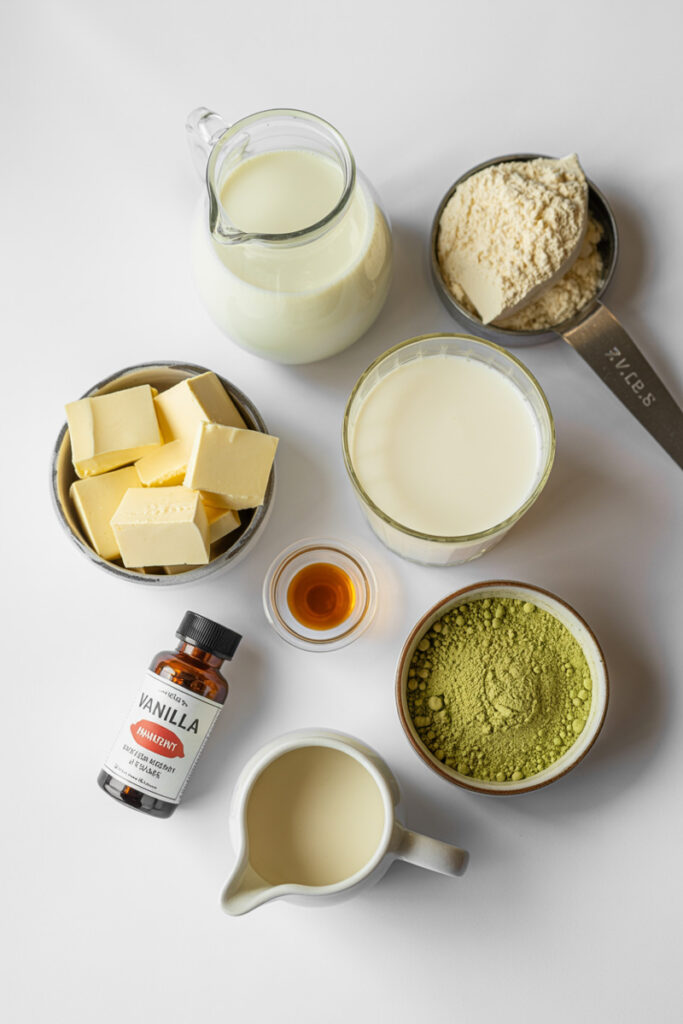
Our creamy base starts with two kinds of milk: 1 cup of Fairlife 2% milk and 1 cup of unsweetened almond milk. I love using Fairlife because it’s ultra-filtered, which just means it’s higher in protein and lower in sugar. This really helps with the final texture. The almond milk keeps it light, so the matcha flavor can really be the star.
For an extra protein kick, we’re adding 1 scoop of your favorite vanilla protein powder.
Now for the flavor. A tablespoon of ceremonial grade matcha powder is a must. It gives you that beautiful, vibrant green color and a smooth flavor that isn’t bitter. It really is a step up from the regular stuff. To round it out, we’ll add ½ tsp of vanilla extract and 1 tbsp of Silk vanilla coffee creamer for a little extra sweetness and depth.
And here’s my secret weapon: 1 tbsp of vanilla Jello pudding mix. I know, it sounds weird! But this is the trick that prevents ice crystals from forming. It guarantees your ice cream will be silky smooth every single time. It’s a game-changer.
| Ingredients | 1 Pint | 2 Pints | 3 Pints |
| Fairlife 2% Milk | 1 cup | 2 cups | 3 cups |
| Unsweetened Almond Milk | 1 cup | 2 cups | 3 cups |
| Vanilla Protein Powder | 1 scoop | 2 scoops | 3 scoops |
| Vanilla Jello Pudding Mix | 1 tbsp | 2 tbsp | 3 tbsp |
| Vanilla Extract | 1/2 tsp | 1 tsp | 1.5 tsp |
| Ceremonial Matcha Powder | 1 tbsp | 2 tbsp | 3 tbsp |
| Silk Vanilla Coffee Creamer | 1 tbsp | 2 tbsp | 3 tbsp |
A quick note on substitutions: You can use whole milk for a richer base. If you don’t have the pudding mix, a tiny pinch (about ⅛ tsp) of guar gum can do a similar job.
Your Step-by-Step Guide to Matcha Perfection
Let’s walk through this together. It’s incredibly simple.
Step 1: Make the Base
Grab your Ninja Creami pint. We’re going to mix everything directly in it to save on dishes. Yes, please.
Pour in the Fairlife milk, almond milk, and vanilla creamer. Then, add the dry stuff: the protein powder, pudding mix, and that gorgeous matcha powder. Finish with a splash of vanilla.
Now, grab your handheld frother and blend everything for about 30-60 seconds. You’re looking for a smooth, pale green liquid. The goal is to have zero clumps. If you see any powder stuck to the sides, scrape it down. A smooth base now means smooth ice cream later!
Step 2: The Big Chill
Once it’s all blended, pop the lid on the pint container. Now for the most important step: freezing. Place the pint on a totally level surface in your freezer. If it freezes at an angle, it could mess up the Creami’s blade.
Let it freeze for a full 24 hours. I know, waiting is the worst. But it needs to be frozen solid for the machine to do its thing.
Step 3: The First Spin
It’s time! Take your pint out of the freezer. I like to run the container under hot water for about 60 seconds, just to warm up the sides a bit.
Place the pint into the outer bowl, attach the blade lid, and lock it into your Ninja Creami. Press the “Lite Ice Cream” button. This setting is perfect for bases like ours that are lower in fat. The machine will get loud, but that’s just the sound of magic happening.
Step 4: The Re-Spin for Ultimate Creaminess
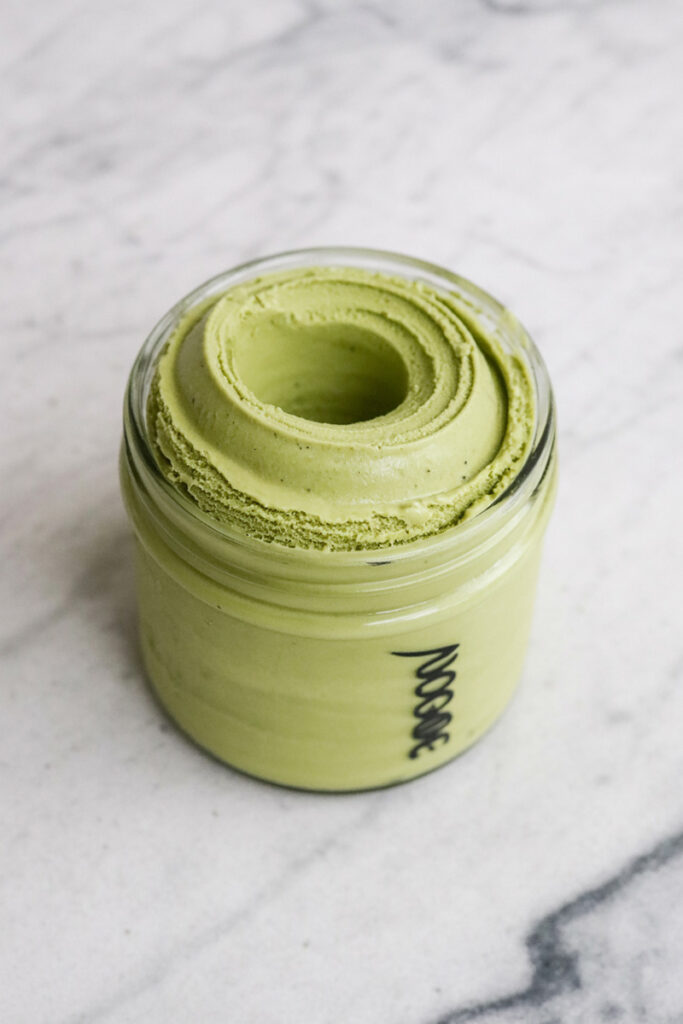
After the first spin, take a look. It will probably look crumbly, almost like powdery green snow. Do not panic! This is completely normal.
This is where the real transformation happens. Just lock it back into the machine and press the “Re-Spin” button. This second spin almost always turns those crumbs into a perfectly smooth and creamy ice cream.
If it’s still a little crumbly after the re-spin, just add one more tablespoon of milk or creamer and hit “Re-Spin” one last time. That little bit of extra liquid will bring it all together.
Step 5: Add Your Mix-Ins (Optional)
Your ice cream is now perfectly smooth and ready to eat. But if you’re feeling a little extra, you can add some mix-ins.
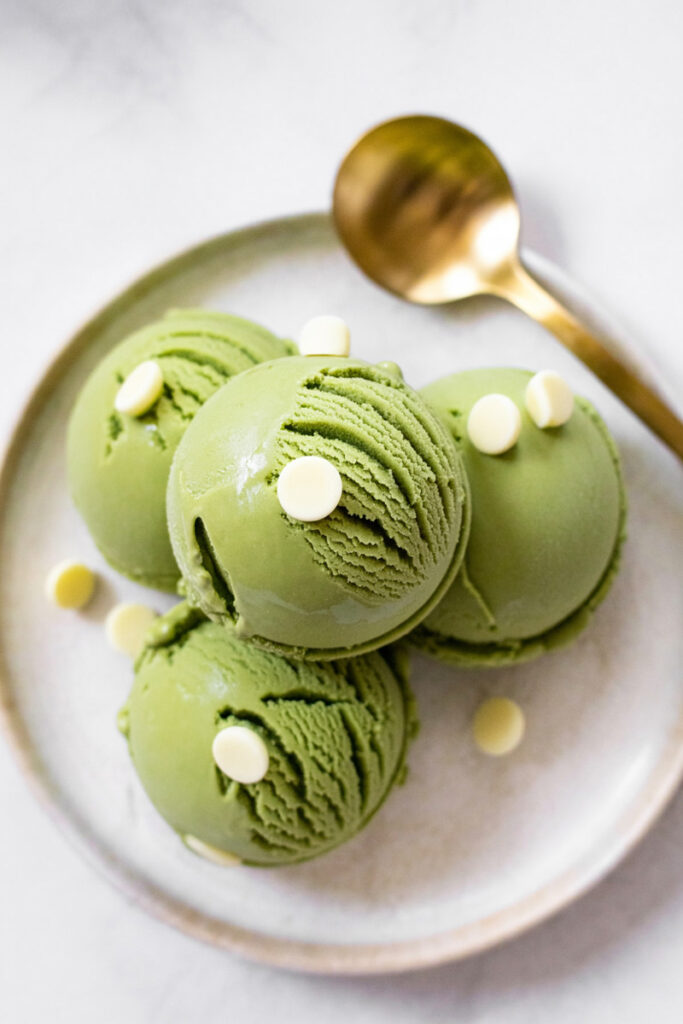
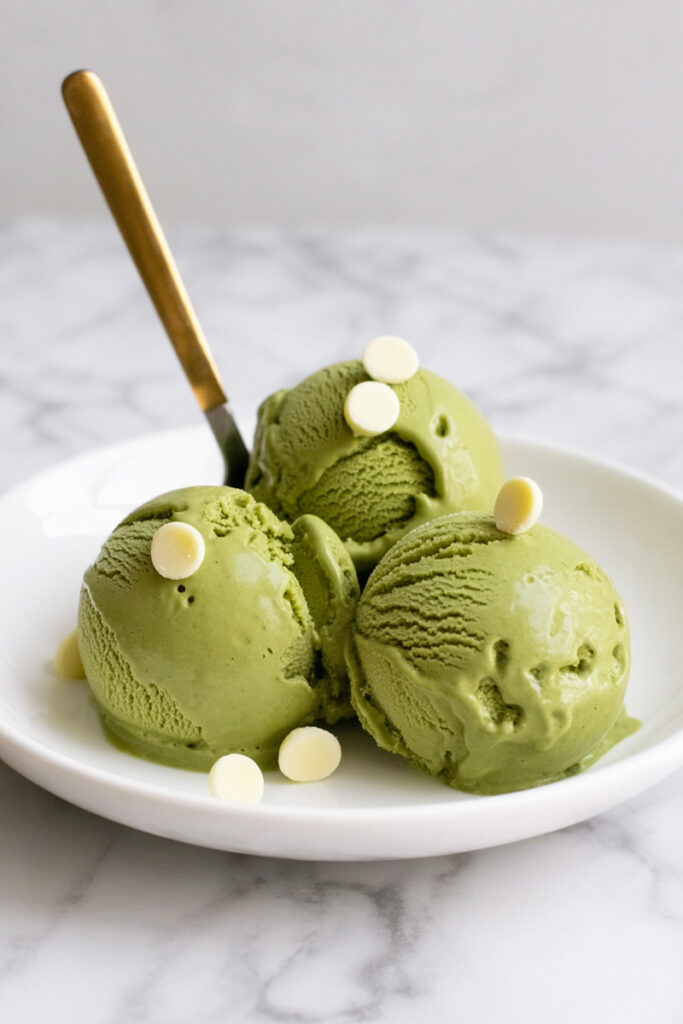
Use a spoon to make a little hole in the center of the ice cream and drop in your favorites. White chocolate chips are amazing with matcha. Crushed graham crackers would be great, too. Put the pint back in the machine and press the “Mix-In” button.
Make It Your Own
One of the best things about this recipe is how easy it is to customize.
- Go Dairy-Free: Want a vegan version? Easy. Use a full-fat plant-based milk (like canned coconut milk or a creamy oat milk) instead of the Fairlife. Just make sure you use a plant-based protein powder and a dairy-free creamer.
- Matcha Latte Ice Cream: Add a teaspoon of instant espresso powder to the base for a coffee-shop vibe.
- Fruity Twist: Fold in a handful of fresh raspberries or chopped strawberries during the “Mix-In” cycle. So good.
Time to Eat! (And How to Store Leftovers)
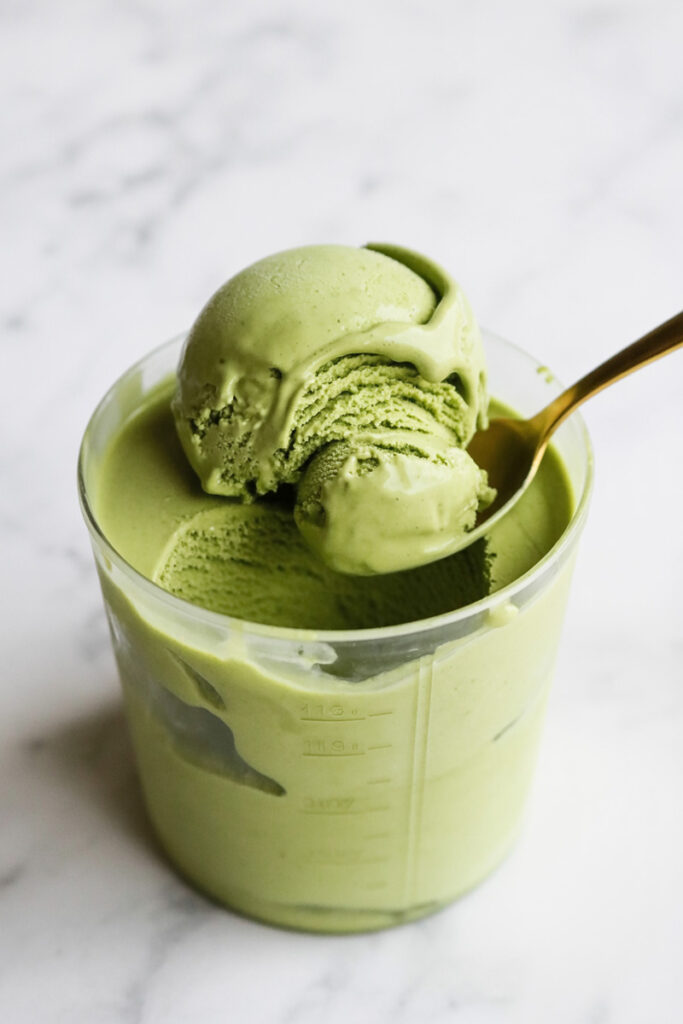
You did it! Time to enjoy the fruits of your… well, your machine’s labor. I love serving this in a chilled bowl to keep it from melting too fast. You can even dust a little extra matcha powder on top.
If you somehow have leftovers, smooth the top of the ice cream in the pint and pop the lid back on. Store it in the coldest part of your freezer.
When you want another scoop, it will be frozen solid again. No worries! Just pop the pint back into the Ninja Creami and run it on the “Lite Ice Cream” or “Re-Spin” setting once. It will return to that just-made, perfectly creamy texture. This is the real magic of the Creami—fresh-spun ice cream, every single time.
Enjoy every spoonful! Happy churning!
PrintNinja Creami Matcha Ice Cream
Whip up this vibrant, earthy, and incredibly smooth high-protein matcha ice cream using your Ninja Creami. Thanks to a secret ingredient, this recipe delivers a perfect, non-icy texture every single time. It’s a delicious, guilt-free treat that’s ridiculously easy to make!
- Prep Time: 5 minutes
- Cook Time: None
- Total Time: 24 hours 5 minutes (includes freezing)
- Yield: 1 Pint 1x
- Category: Dessert
- Cuisine: Japanese-Inspired
Ingredients
- 1 cup Fairlife 2% milk
- 1 cup unsweetened almond milk
- 1 scoop vanilla protein powder
- 1 tbsp ceremonial matcha powder
- 1 tbsp vanilla Jello instant pudding mix
- 1 tbsp Silk vanilla coffee creamer
- ½ tsp vanilla extract
Instructions
- Combine & Blend: Add all ingredients directly into your Ninja Creami pint container. Use a handheld frother to blend everything for about 30 seconds until it’s completely smooth and there are no clumps.
- Freeze: Screw the lid on tightly and place the pint on a perfectly flat surface in your freezer. Let it freeze for a full 24 hours until it’s a solid block.
- First Spin: Once frozen, place the pint into the outer bowl, attach the blade lid, and lock it into your Ninja Creami. Select the “Lite Ice Cream” setting and let it run.
- Re-Spin for Creaminess: After the first spin, the mixture will likely look dry and crumbly—this is normal! Put it back in the machine and press the “Re-Spin” button. This second cycle will transform it into a perfectly smooth and creamy ice cream.
- Serve & Enjoy: Scoop into a bowl and enjoy immediately! If you’re adding mix-ins, create a small hole in the center, add your goodies, and run the “Mix-In” cycle.
Notes
Tips & Tricks:
- Don’t Skip the Pudding Mix! It sounds strange, but it’s the secret weapon that prevents ice crystals and makes the texture incredibly creamy.
- Use Ceremonial Grade Matcha: It truly makes a difference in getting that vibrant color and smooth, non-bitter flavor.
- Freeze on a Level Surface: This is important! A tilted frozen base can potentially damage the Creami’s blade.
Serving Suggestions:
- For a simple, elegant touch, dust the top with a little extra matcha powder.
- This pairs beautifully with white chocolate chips, fresh raspberries, or a drizzle of condensed milk.
Storage Instructions:
- To store leftovers, smooth the top of the ice cream in the pint, cover with the lid, and return to the freezer.
- When you’re ready to eat it again, the ice cream will be very hard. Just pop it back in the Ninja Creami and run one “Re-Spin” cycle to restore its perfectly creamy, fresh-spun texture.